TensorFlow. Word Generation with LSTM
Word generation is a captivating aspect of natural language processing (NLP) that involves creating meaningful and contextually appropriate text. Google TensorFlow, a powerful open-source machine learning framework, provides the tools necessary to build and train models for this purpose. In this blog post, we will explore the basics of word generation using TensorFlow, highlighting its capabilities, practical applications, and the steps involved in developing your own word generation models.
Prerequisites
To work with TensorFlow models, you will need two libraries open-source Python libraries:
NumPy (Numerical Python). It provides support for large, multi-dimensional arrays and matrices, along with a collection of mathematical functions to operate on these arrays efficiently. TensorFlow developed by Google, is a powerful tool for machine learning and artificial intelligence applications.
📝 This article based on TensorFlow version 2.17.0 and NumPy version 1.26.4.
To install the libraries with the pip run the following commands in terminal:
pip install tensorflow
pip install numpy
For more information on how to install TensorFlow, please refer to the official guide: Install TensorFlow 2.
Tensor
Before we begin creating a model, it's important to understand what a tensor is in the context of machine learning. A tensor is a multi-dimensional array that generalizes scalar, vector, and matrix values to higher dimensions. They are a fundamental part of many machine learning frameworks like TensorFlow and PyTorch.
📝 Tensor is a fundamental data structure in many machine learning frameworks.
In machine learning, tensors are used to store input data, weights, and output values in neural networks. They support a wide range of mathematical operations that are essential for training and deploying machine learning models.
The image below shows four examples of tensors: 0D (scalar), 1D (vector), 2D (matrix), and 3D (tensor).
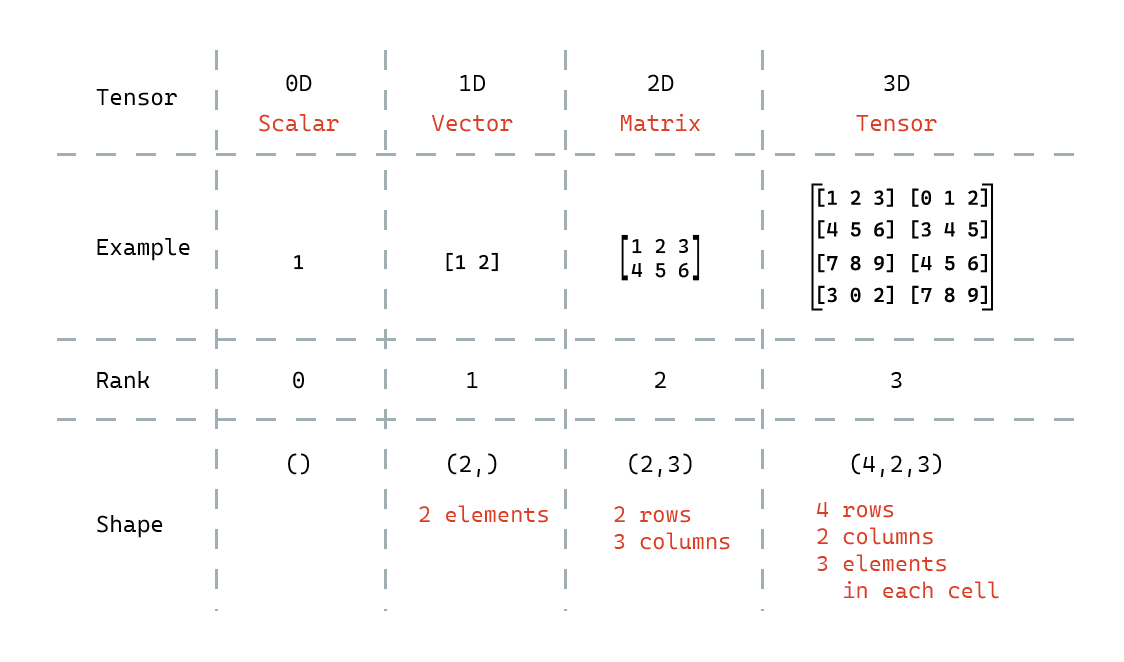
📝 The shape of a tensor tells you the sizes of each dimension, and the rank of a tensor indicates how many dimensions it has.
Dataset
To train the model, we will use a subset of the most popular English words. We need to download this list and store it as an array.
import tensorflow as tf

# Download dictionary
path_to_dict = tf.keras.utils.get_file(
    "popular.txt", "https://raw.githubusercontent.com/dolph/dictionary/master/popular.txt"
)

# Open the dictionary
dict = open(path_to_dict, "rb").read().decode(encoding="UTF-8")

# The text contains one word per line. We split the text into a list of words.
words = dict.splitlines()
Tokenizer
In the previous post, we used numbers to train our model and to get predicted values. This approach works well with tensors, but for generating words, we need to work with characters instead of numbers. Therefore, we need two functions: one to convert words into tensors and another to convert tensors back into words. TensorFlow provides a tokenizer, which is a tool that converts text into a sequence of tokens.
# Initiate a new instanse of tokenizer
tokenizer = tf.keras.preprocessing.text.Tokenizer(char_level=True)

# Create tokens for each character in the words list
tokenizer.fit_on_texts(words)
As a result of running this code, we will obtain a unique value (token) for each character.
{
    'e': 1,  'r': 2,  't': 3,  'n': 4,  'i': 5,
    'a': 6,  'o': 7,  'l': 8,  's': 9,  'c': 10,
    'u': 11, 'd': 12, 'p': 13, 'm': 14, 'y': 15,
    'h': 16, 'g': 17, 'f': 18, 'b': 19, 'v': 20,
    'w': 21, 'k': 22, 'x': 23, 'z': 24, 'q': 25,
    'j': 26, '-': 27
}
Now with the tokenizer instance we can represent any text with the sequence of tokens.
For example, the following code converts string "Vitaly Zhukov" into tensor:
# Convert text to tensor
tokenizer.texts_to_sequences("Vitaly Zhukov")
"Vitaly Zhukov" in tensor format:
[[20], [5], [3], [6], [8], [15], [], [24], [16], [11], [22], [7], [20]]
Empty token for the space character means the index does not contain the character.
📝 The tokenizer returns an empty token if a character is not present in the index.
Reverse operation to get text from a tensor:
# Convert tensor to text
tokenizer.sequences_to_texts([[20], [5], [3], [6], [8], [15]])
Output:
['v', 'i', 't', 'a', 'l', 'y']
Therefore, the tokenizer allows us to convert our data (text) into a format that can be used with the TensorFlow model, and then convert the tensor back into text.
End of word
Additionally, we need to manually add a special token to indicate the end of a word. Otherwise, the model may predict a character incorrectly and generate an infinite word.
# Add meta-token representing end of word
tokenizer.word_index["<END>"] = len(tokenizer.word_index) + 1
Input and Сorresponding Output
To train the model, we need to provide input data and the desired output. The following code generates the data sets.
# Size of vocabulary
vocab_size = len(tokenizer.word_index) + 1

# Max length of words in the vocabulary
max_length = max(map(len, words)) + 1

# Vocabulary in tensor format
encoded_words = tokenizer.texts_to_sequences(words)

meta_token = tokenizer.word_index["<END>"]

# Dataset to train
input_data = []

# Corresponding dataset to test
output_data = []

for seq in encoded_words:
    # Append the end of word token
    alt_seq = seq + [meta_token]
    for i in range(1, len(alt_seq)):
        input_data.append(alt_seq[:i + 1])

# Make input data sequences to the same length
input_data = np.array(tf.keras.utils.pad_sequences(input_data, maxlen=max_length, padding='pre'))

input_data, validate_data = input_data[:,:-1], input_data[:,-1]
validate_data = tf.keras.utils.to_categorical(validate_data, num_classes=vocab_size)
Using the word "zebra" as an example, I'll demonstrate the sample datasets:
| Input Sequence (input_data) | Next Character (validate_data) |
|---|---|
| ['z'] | 'e' |
| ['z', 'e'] | 'b' |
| ['z', 'e', 'b'] | 'r' |
| ['z', 'e', 'b', 'r'] | 'a' |
| ['z', 'e', 'b', 'r', 'a'] | <END> |
So, if the input sequence of characters is ['z', 'e'] the correct output should be 'b'.
Model
The following code creates a new sequential model with five layers:
model = tf.keras.Sequential()

model.add(tf.keras.Input(shape=(50,), name="input"))
model.add(tf.keras.layers.Embedding(vocab_size, 16))
model.add(tf.keras.layers.LSTM(128, return_sequences=True))
model.add(tf.keras.layers.LSTM(128, return_sequences=True))
model.add(tf.keras.layers.LSTM(128))
model.add(tf.keras.layers.Dense(vocab_size, activation="softmax"))

model.compile(
    optimizer=tf.keras.optimizers.Adam(),
    loss=tf.keras.losses.CategoricalCrossentropy(),
    metrics=[tf.keras.metrics.Accuracy()]
)
Embedding Layer
The first layer of the model is the Embedding layer, which is used to convert tokenized input text into vectors with a size of 16. This layer has trainable weights that help place similar characters closer together in vector space.
📝 For more complex data, you may need to use a larger number of dimensions for the dense embedding. However, for the character embedding, 16 should be sufficient.
Additionally, the embedding layer has trainable parameters that can be adjusted during the model training process.
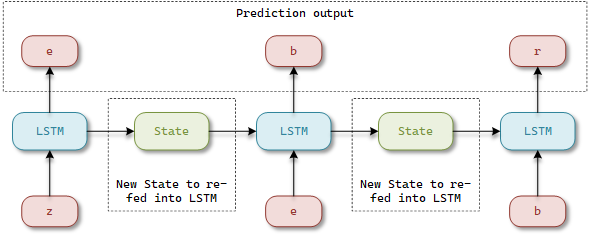
LSTM Layers
LSTM (Long Short-Term Memory) layers have a unique structure that includes memory cells and gates (input, forget, and output gates) to control the flow of information.
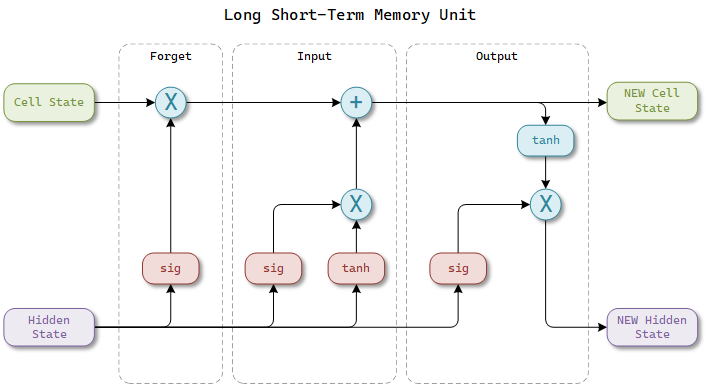
The forget gate determines what information from the cell state should be discarded. The input gate controls the extent to which new information flows into the cell state. The output gate controls the information that is output from the cell.
These gates work together to maintain and update the cell state, allowing LSTM to learn and remember over long sequences of data.
The model contains three LSTM layers. The first layer takes an initial sequence and produces a sequence of hidden states. The second (subsequent) layer receives the hidden states from the previous layer as input and generates a new sequence of hidden states. The final layer generates the cell states that are fed into the dense layer.
📝 You can add multiple sequent LSTM layers to the model, in addition to the initial one.
Dense Layer (softmax)
A dense layer in TensorFlow is a type of neural network layer that is fully connected, meaning that each input node in the layer is connected to every output node. When combined with a softmax activation function, this type of layer converts the output of the layer into a probability distribution, which makes it well-suited for classification tasks.
Train the Model
Now, we can train the model by specifying the number of iterations:
model.fit(input_data, validate_data, batch_size=1024, epochs=200)
Using the Model
To use the model, we need to provide an input tensor (tokenized text) and then convert the output tensor back into text.
prefix = "zebr"

# Convert the prefix into a tensor of the desired length.
input = tokenizer.texts_to_sequences([prefix])
input = tf.keras.utils.pad_sequences(encoded, maxlen=50, padding="pre")

# Predict the next character
output = np.asarray(model.predict(input, verbose=0, batch_size=1)[0]).astype('float64')

# Most likely character index
char_index = np.argmax(output)
char = tokenizer.sequences_to_texts([[char_index]])
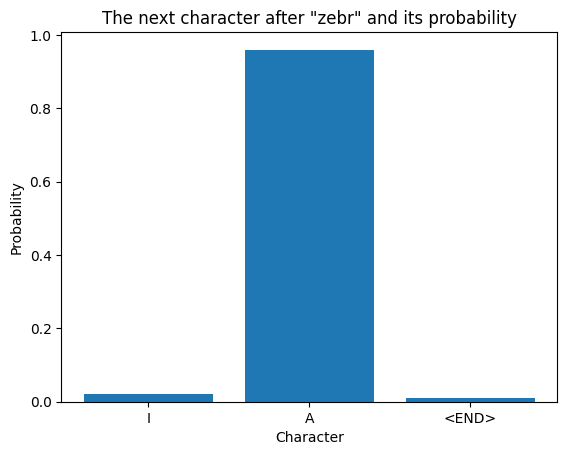
The model predicts one character at a time. The output of the model is a probability distribution. For example, the next character probabilities for the input "zebr":
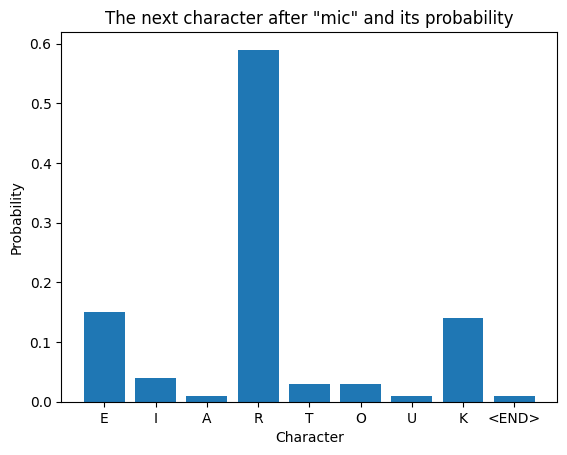
Probabilities for the input "mic":
Word Generation
To generate a word, we need to randomly select the most likely prediction for each input character. We can do this by selecting from a set of top-predicted characters, where the selection is based on the probability value of each character.
The predict_next_character function returns a randomly selected character from the set of top crazy_index items, sorted by probability.
def predict_next_character(prefix, crazy_index:int):
    """Predict next characters

    :param prefix: Existing part of the word
    :param crazy_index: The number of predicted characters is used to choose one.
    :return: Predicted character
    """
    encoded = tokenizer.texts_to_sequences([prefix])
    encoded = tf.keras.utils.pad_sequences(encoded, maxlen=50, padding="pre")
    predicted_characters = np.asarray(model.predict(encoded, verbose=0, batch_size=1)[0]).astype('float64')

    if crazy_index is None or crazy_index == 0:
        return np.argmax(predicted_characters)
    else:
        if crazy_index > len(predicted_characters) : crazy_index = len(predicted_characters)

        # getting top {crazy_index} possible characters
        candidate_args = np.argsort(predicted_characters, axis=0)[-crazy_index:]
        probas = np.take(predicted_characters, candidate_args)

        # randomly get one the top possible characters
        probas = np.random.multinomial(1, np.exp(np.arctan(probas))/np.sum(np.exp(np.arctan(probas))),1)

        return candidate_args[np.argmax(probas)]
To generate the entire word, we'll create a generate_words function that will call predict_next_character repeatedly.
def generate_words(prefix, no_words:int, crazy_index:int):
    """Generate words

    :param prefix: Existing part of the word
    :param no_words: Number of words to generate
    :param crazy_index: The number of predicted characters is used to choose one.
    :return: List of generated words
    """
    max_text_lenght = 20
    meta_token = tokenizer.word_index["<END>"]
    words = []

    for _ in range(no_words):
        word_prefix = prefix
        for _ in range(max_text_lenght):
            predicted_character = predict_next_character(word_prefix, crazy_index)

            # stop prediction if the next character is the meta token presenting end of word
            if predicted_character == meta_token:
                break

            # convert tensor to character
            predicted_char = tokenizer.sequences_to_texts([[predicted_character]])

            # append the character to the result word
            word_prefix = word_prefix + predicted_char[0]

        words.append(word_prefix)

    return words
Now, we can generate words using the model:
generate_words("", 10, 3)
Output:
['our',
 'accounated',
 'actory',
 'heavish',
 'orgescins',
 'outragron',
 'homeby',
 'homeballozingly',
 'homosexoard',
 'allows']
In conclusion, leveraging TensorFlow and LSTM networks for word generation opens up exciting possibilities in natural language processing. By following the steps outlined in this post, you can build and train your own models to generate text.
Whether you’re a beginner or an experienced developer, this guide provides a solid foundation to explore the capabilities of TensorFlow in word generation.
Happy coding!
GitHub
Jupyter Notebooks (for creating new model and using existing one) are available on my github repo: github.com/vzhukov/tensorflow-samples.